
Read this illustrator tutorial to learn how to draw different types of chocolate truffles and create a nice packaging. By the end you will be able to draw other types of packages, even other shapes following the same idea and for any product that you want. Great for drawing mockups for packaging design. So let’s get started!
Draw the Truffles
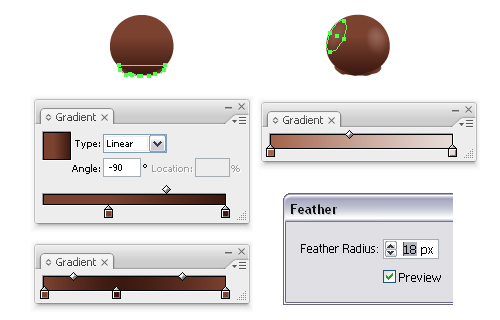
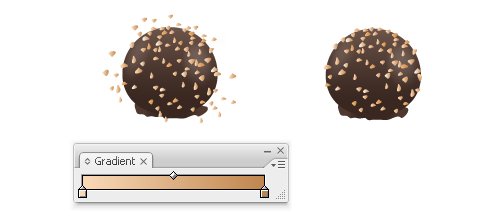
1. The first thing to do is to draw a selection of truffles because you will need them to create the front of the package box. So take the Ellipse Tool and draw a circle then fill it with a chocolate gradient using brown (R=123, G=66, B=48) and dark brown (R=59, G=24, B=15). Next draw a wavy path with the Pencil Tool under the circle and then close the path at the top. Fill it with a similar gradient and send it to back. To add some glow, draw an oval shape with the Ellipse Tool like in the image. Fill it with a linear gradient from (R=163, G=98, B=73) to (R=231, G=220, B=216) then go to Effect > Stylize > Feather and set a 18 px radius value. Do the same for the right side.
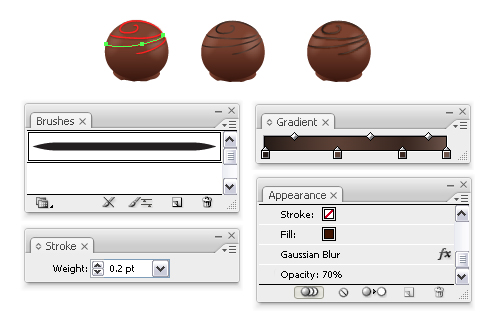
2. Now using the Pen Tool, draw 4 curved paths like the red ones in the image from below, stroke them using a brush called Tapered Stroke. You can find it in the Brush Libraries menu > Artistic > Artistic_Ink and change the Stroke weight value to a very thin one like 0.15-0.2 pt. When you are done, go to Object menu and Expand Appearance then fill them with a linear gradient using the following colors: (R=38, G=28, B=24), (R=92, G=65, B=54), (R=57, G=39, B=32) and (R=109, G=85, B=75). To add some shadow, Copy and Paste in back these 4 shapes, group them, change the fill color to dark brown (R=62, G=20, B=0), go to Effect > Blur and apply a 1 px Gaussian Blur. Also reduce the Opacity to 70%. If the blur crosses over the sides you can solve the problem by using the first circle drawn to create a Clipping mask.
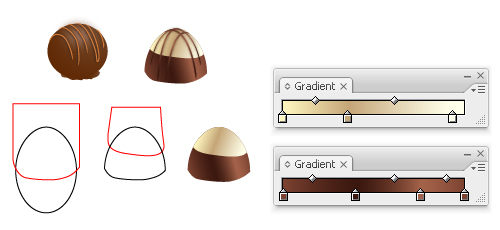
3. You can see in the next image other 2 types of truffles that I made in the same way. For the second one first draw the black oval then the red path on top, select them both and click Intersect shape areas and Expand from the Pathfinder Panel. Copy and Paste in back the obtained shape, then draw the other red path on top, select both the pasted shape and the red one and click again Intersect shape areas and Expand. Fill the bottom shape with a linear gradient using the following colors: (R=123, G=66, B=48), (R=59, G=24, B=15), (R=163, G=98, B=73), (R=123, G=66, B=48) and for the white chocolate gradient the colors that I used are: (R=254, G=246, B=191), (R=196, G=165, B=119) and (R=255, G=255, B=234).
The thin chocolate shapes on top are made in the same way like explained at the previous step.
4. Here’s how to make the truffle with the nut pieces on top. Draw a very small circle with the Pen Tool, multiply it and now to make them different from each other we will apply the Squeeze effect. So select one of the circles, go to Effect > Warp > Squeeze and change the values like in the image from below, then do the same to the other 4 circles just play with the values and change them for each circle. This way each shape will be different. Expand Appearance, group them and drag them into the Symbols Panel when you are done.

5. Now take the Symbol Sprayer Tool and start spraying on top of a truffle, drawn like the other ones, click on the Break Link to Symbol button at the bottom of the Symbols Panel and change the fill to a linear gradient from (R=243, G=180, B=114) to (R=191, G=133, B=78). Also you can change the colors to make some of the nut pieces darker or lighter but this is optional. All that is left to do is to delete the pieces that cross over the truffle’s sides.
6. Here is one more example of truffle in the shape of a heart. Take the Pen Tool and draw a heart shape then rotate it a bit to the right. Now draw a shape behind the right side like the one selected below and then another one behind the left side. Scale a bit the first heart shape drawn and send it to front because you will use it to mask the texture that you can see at the next step.

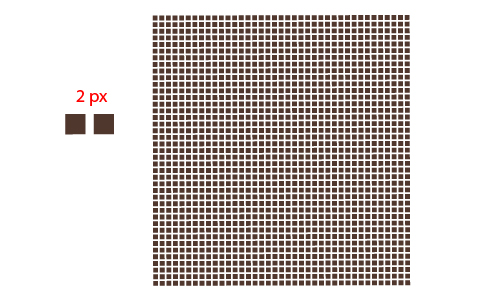
7. To create the texture use the Rectangle Tool, draw a very small square. Duplicate it and place it next to the first one then press the right arrow key on your keyboard to move it a bit to the right. My keyboard increment is set to 1 px so I pressed 2 times to move it away from the other one. Select now the 2 squares, multiply them and do the same to move them, then when you have 4 squares multiply them all at once to finish the first row faster. (messinascatering.com) Multiply this row until the texture is big enough to cover the heart shape. Group all the squares, rotate them a bit to the right to fit with the position of the heart, place them on top, select both the texture group and the smaller heart shape made earlier (that must be on top) and go to Object > Clipping Mask > Make.
Draw the Chocolate Package
8. In the next part I will explain how to draw the package box and I will start with the front. Take the Rectangle Tool and draw a square with the shown dimensions. Next draw the 2 very thin rectangles on the left side and at the bottom of the square. Colors are not important at this point because they will be changed later. Draw another rectangle in the middle then type the text like in the image below and Expand it when you are done. Because of the small size of the truffles on top of the box you can replace some of the gradients just with a similar fill color and it’s recommended to delete the shadows for each one (if there are). This way the front will be simplified and much easy to work with when it will be applied so do this before you place them on top.
You can add more shapes or text at this point if you want but a much more complex front will be difficult to handle by Map Art and quality will be lost. This is the reason why no gradients are used at this point but that will be changed later. Group all the shapes and drag them into the Symbols Panel when you are done.

9. Draw another square with the same dimensions and now apply Effect > 3D > 3D Extrude & Bevel.
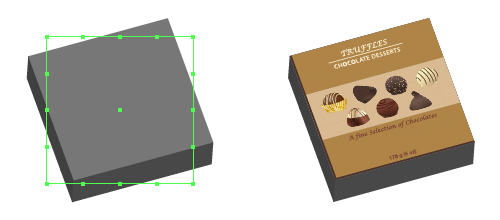
10. See here how to change the values and after that click the Map Art button so you can apply the front of the package box.
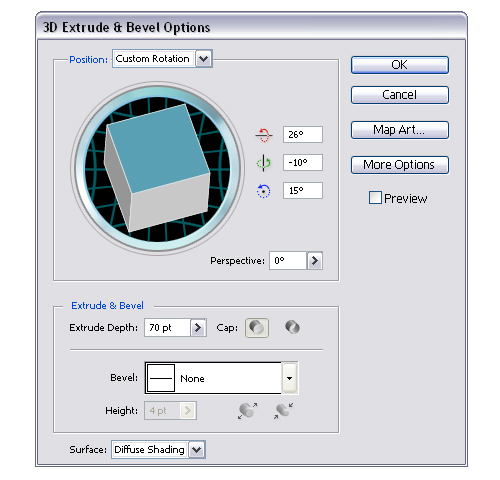
11. Select the proper surface by clicking the arrows and select also the symbol saved earlier from the list. Now the box should look like the one in the image at the step 9.

12. It’s time for the gradients. First go to Object and Expand Appearance then select the top rectangle and fill it with a linear gradient using (R=175, G=132, B=71), (R=217, G=186, B=146) and again (R=175, G=132, B=71). Do the same for the other rectangle under the chocolates. If after Expand your front side was divided in 4 parts like in my case just select them all and click Add to shape area > Expand to solve the problem then fill it with the same gradient. Do the same for the left side.

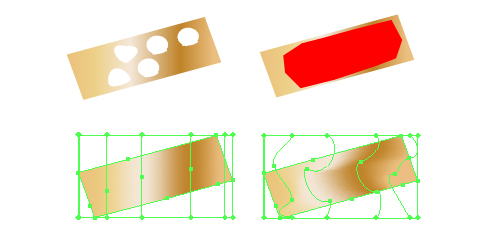
13. Next select the box but without the truffles group and the text, Copy and Paste it in back, scale it 96% and place it a bit down like in the image from below. Also draw more thin rectangles like at the step 8 as shown in the close-up and 2 lines above and below the chocolates on top of the middle rectangle.

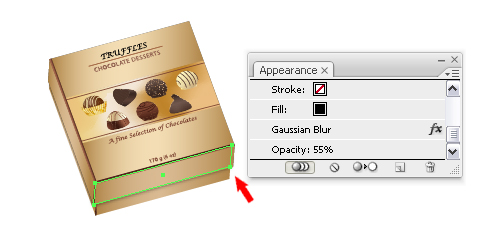
14. To add a bit of shadow Copy and Paste in back the selected rectangle in the image, change the fill color to black, go to Effect > Blur and apply a 3 px Gaussian Blur. Lower the Opacity to 55% and then do the same for the left side of the box. If the blur crosses over the sides of the box move a bit the points using the Direct Selection Tool like shown.
15. It’s time to change the fill for the middle rectangle on the front. If yours looks like mine at this point because of the truffles simply draw with the Pen Tool a shape around the empty areas to cover them, select them both and click Add to shape area and Expand like before. The gradient that I used to fill it is called Polished Brass and you can find it in the Swatch Libraries. Now go to Object > Expand and this time choose Expand Gradient to Gradient Mesh. Add more points on the vertical paths using the Add Anchor Point Tool then move them randomly using the Direct Selection Tool to create a unique look. You can see in the image at the previous step how my chocolate box looks like at this point.
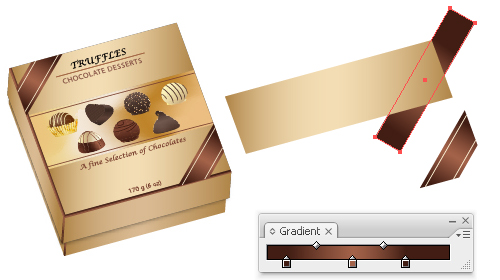
16. Next take the Rectangle Tool again, draw a long rectangle and then Copy and Paste in front the bottom rectangle under the truffles, select them both and click Intersect shape areas and Expand. Fill the obtained shape with a linear gradient using: (R=65, G=29, B=19), (R=163, G=98, B=73) and again (R=65, G=29, B=19) then change the angle value to 60 degrees. Draw 2 more lines on top. Expand them and fill them with cream (R=255, G=243, B=213). Group all the shapes and place them over the right down corner then do the same for the other one.
17. Repeat the previous step to create similar shapes for the front side and for the left side of the box. Adjust the gradient angles to fit perfectly with the first 2 made above.

18. Now take the Polygon Tool and draw one then using the Delete Anchor Point Tool delete the 2 top points. Also drag the sides closer to each other using the Selection Tool to make it smaller. Place it like in the next image then to add some shadow Copy and Paste it in back, fill it with black, move it a bit down, apply a 2 px Gaussian Blur and lower the Opacity to 60%.

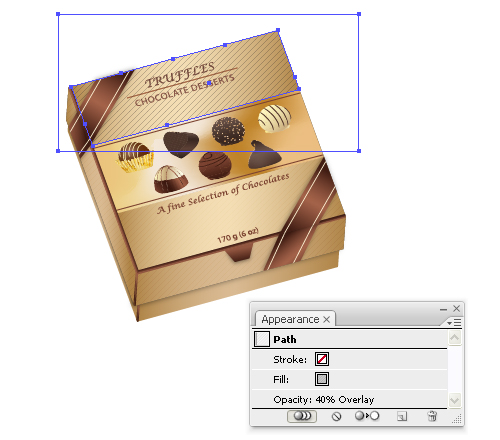
19. The work is almost done. Now add some texture and to do that draw a rectangle big enough to cover the top rectangle of the box’s front, go to Swatches Panel, open the Swatch Libraries menu > Patterns > Basic Graphics > Basic Graphics_Textures and use Diagonal Lines to fill it. Copy and Paste in front the top rectangle, select both the texture rectangle and the pasted one (that must be on top) and go to Object > Clipping Mask > Make. Set the texture rectangle to Overlay and reduce the Opacity to 40%. Do the same for the other rectangle under the chocolates and the ones on the sides.
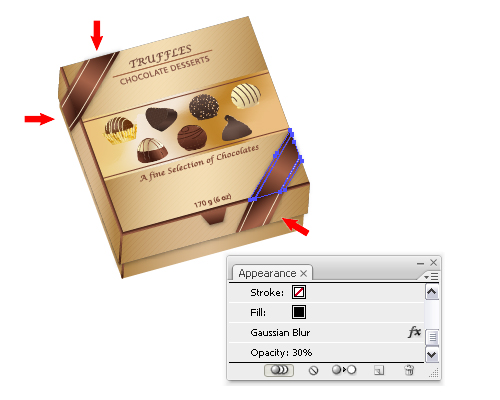
20. Let’s add some more shadow. Copy and Paste in back the shapes made at the steps 16 and 17 but just the brown ones without the lines, fill them with black, apply a 2 px Gaussian Blur and reduce the Opacity to 30%.
Final Image
You are done and here is the final image with the package box and all the truffles around it, just add the ribbon and a simple bow.
To download the source file for this tutorial, you will need to login as a member.
Sign up today to access all exclusive members content!
Kindly comment what other packaging tutorial you would like to learn so that we can publish it on the next round!

wow, this is just in time, ow i can put some stuff on my packaging projects, way cool!
this looks so hard 🙂
Just made it! Love the tutorial! I didn’t do it some things… but still! Thx for the tutorial! o/
Can I just point out that the name of the tutorial is a bit misleading. I was looking to brush up on packaging design and this isn’t really creating the box, but an image of the box…. Thanks anyway.
Love the tutorial! How did you make the gold cup for the milk chocolate truffle with the white stripes?
That was the most complex of all. The tutorial was supposed to be more about the package box than about how to draw chocolate so I skipped.
I think it could be explained in about 5-8 steps and I would love to help you out but I don’t know how I could do that here in a single replay and no images to show you.
Thank you for the tutorial, I have given it to my students to tryout. They are enjoying it so far but I have to guide them through a few of the steps. But a great tute all the same.
woooow
i wont the PSD or EPS …
thanks