
Let’s learn how to create a vector stencil effect in Illustrator. You will learn how to use a brush to outline the text edges to create a nice stencil effect. This stencil effect can be used to a create nice graffiti effect done by spray paint.
Stencil Text Effect
1. Create a 700 by 300px, RGB document. (Simonsezit) Let’s start with the background. We will use this photo for the background. Save it in your hard drive then drag it inside your illustrator document. Make sure that it covers the entire artboard then pick the Rectangle Tool(M) and create a shape the size of your artboard (700 by 300px). Fill it with white then open the Transparency panel (Window > Transparency). Select this fresh shape and the photo, open the fly-out menu of the Transparency panel then select Make Opacity Mask. Finally, lock this masked shape to make sure that you don’t select or move it accidentally.

2. Go to the Swatches panel (Window > Swatches). Open the fly-out menu and click on New Swatch. Give it any name you want (I chose Green), select Spot Color from the Color Type drop down menu and RGB from the Color Mode drop down menu then enter the numbers shown in the following image. Once you did all these things click OK. A new swatch should appear in your Swatches panel. We’ll use it a lot in the following steps. I made it a spot color so that you can easily edit the look of your final illustration. You’ll see what I mean in the final step.

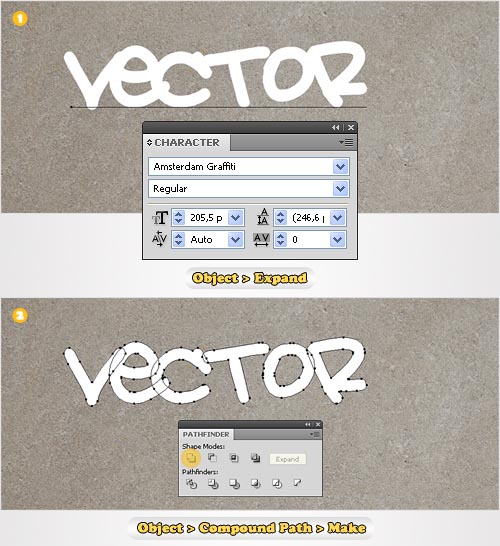
3. Pick the Type Tool(T) and click on your artboard. Enter your text using the Amsterdam Graffiti font with a size of 205,5pt. With this text still selected go to Object > Expand. Select the resulting shapes and click on the Unite button from the Pathfinder panel then go to Object > Compound Path > Make.
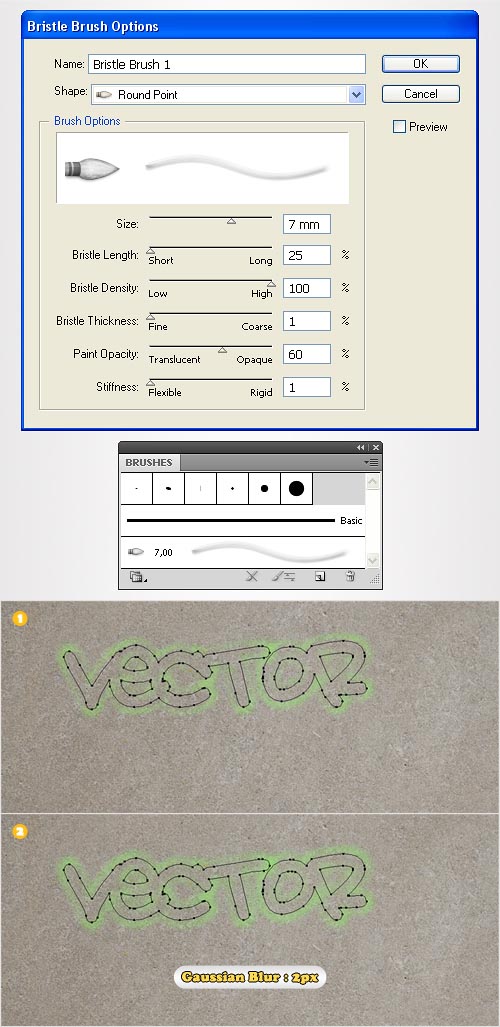
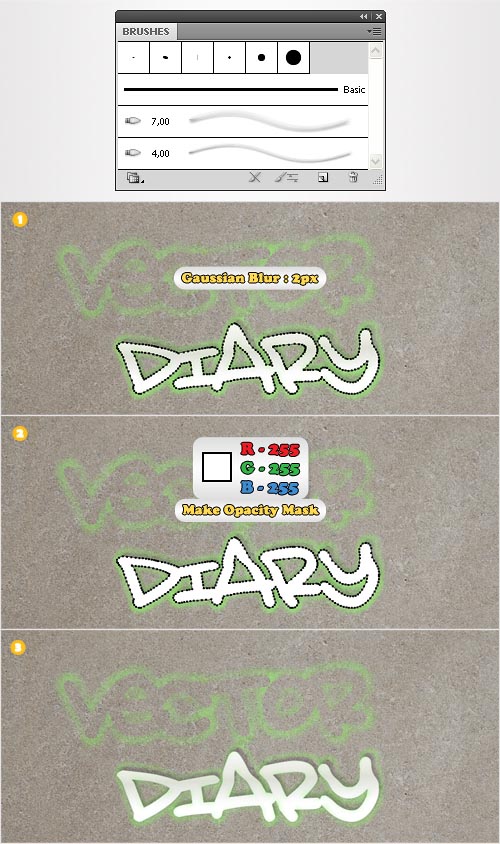
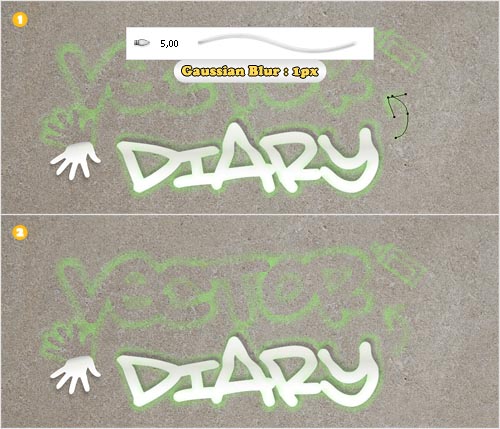
4. Go to the Brushes panel (Window > Brushes). Open the fly-out menu and click on New Brush. Check Bristle Brush then click OK. A new window like the one shown in the following image should open. Enter all the data shown below then click OK. Your new brush should appear in the Brushes panel. Reselect the text made in the previous step. First, fill it with none then click on the fresh brush and use the Green color. With the text shape still selected go to Effect > Blur > Gaussian Blur. Enter a 2px radius then click OK.
5. Duplicate the text shape from the previous step (Ctrl+C > Ctrl+F). Fill this copy only with black then open the Transparency panel. Now, reselect this black copy along with the original text shape. Open the fly-out menu of the Transparency panel, click on Make Opacity Mask then uncheck the Clip box.

6. Reselect the Type Tool(T) and add a second word. Again, expand it then click on the Unite button from the Pathfinder panel then go to Object > Compound Path > Make.
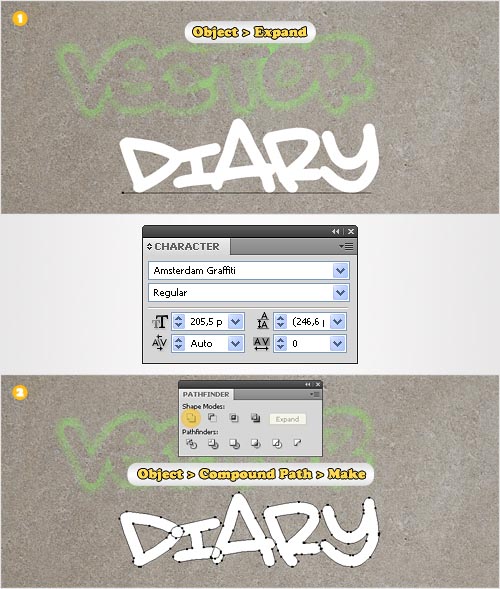
7. Create a second bristle brush. Follow the same steps mentioned in the fourth step then enter the data shown in the following image. Once you created it get back to the second word shape. Again, fill it with none then add the fresh brush. Use the Green color then go to Effect > Blur > Gaussian Blur. Enter a 2px radius then click OK.

8. Duplicate the text shape from the previous step (Ctrl+C > Ctrl+F). Fill this copy only with black then open the Transparency panel. Now, reselect this black copy along with the original shape. Open the fly-out menu of the Transparency panel and click on Make Opacity Mask. Don’t forget to uncheck the Clip box.

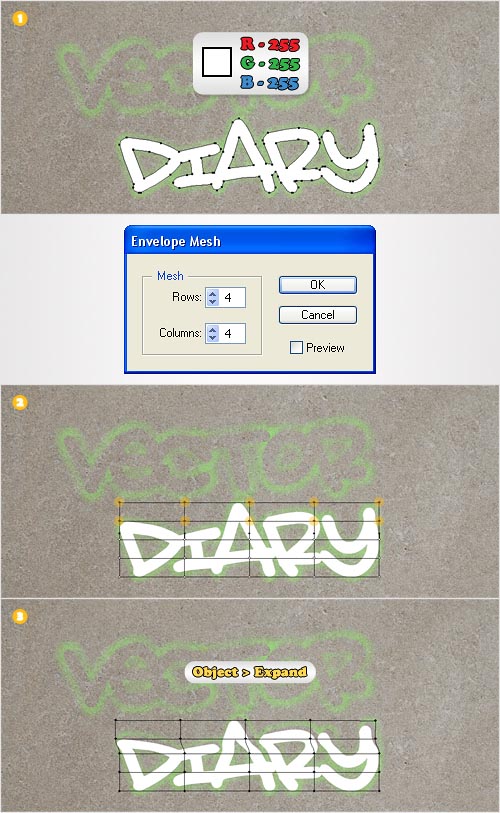
9. Duplicate the masked shape made in the previous step. Select this copy, open the fly-out menu of the Transparency panel and click on Release Opacity Mask. You will get back the two shapes used for masking in the previous step. Remove the one with green brush then select the other one and replace the fill color wi8th white. With this shape still selected go to Object > Envelope Distort > Make with Mesh. Enter 4 for both Rows and Columns then click OK. Now, using the Direct Selection Tool (A) select the points highlighted in the second image and move them a few pixels down and to the left. Finally, go to Object > Expand.
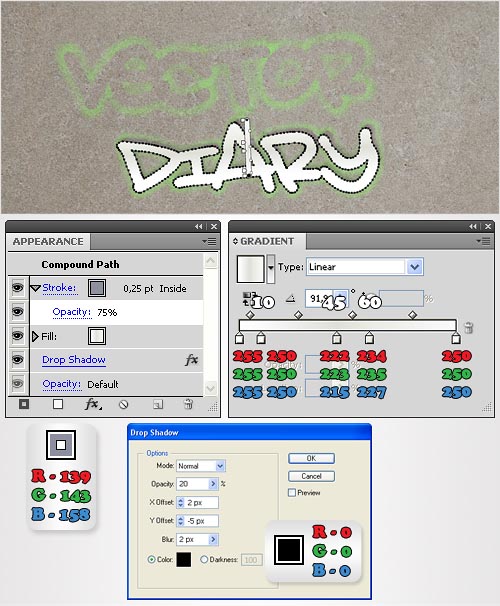
10. Focus on the shape made in the previous step. Fill it with the linear gradient shown below and add a 0,25pt stroke (R=139 G=143 B=158). The white text from the gradient image stands for Location. Select this thin stroke (from the Appearance panel), align it to inside and lower its opacity to 75%. Reselect the entire path, go to Effect > Stylize > Drop Shadow and enter the data shown in the following image.
11. Duplicate the shape made in the previous step. Select this copy, remove all fills, strokes and effects then use the 4mm bristle brush. Add a 2px Gaussian blur effect for this shape then duplicate it. Fill the copy with with white. Select it along with the original shape and go to the Transparency panel. Open the fly-out menu and click on Make Opacity Mask. This time you don’t need to uncheck the Clip box.
12. Let’s continue with the hand shape. Open the fly-out menu of the Brushes panel and go to Open Brush Library > Borders > Borders_Novelty. Here you can find the Hand Brush. Select it, pick the Brush Tool(B) and draw a path. Make it short so that you get only one hand shape. With this path selected go to Object > Expand Appearance. Finally, increase the size of the resulting shape as shown in the second image.

13. Create a new bristle brush using the properties shown below. Reselect the hand shape, fill it with none then click on this new brush. Again, use the Green color then go to Effect > Blur > Gaussian Blur. Enter a 2p radius then click OK. Make a copy of this hand shape and fill it with black. Select this fresh copy along with the original shape and go to the Transparency panel. Ope the fly-out menu, click on Make Opacity Mask then uncheck the Clip box.

14. Make a new copy of the hand shape, fill it with white and bring it in front. Pick the Pen Tool(P) and draw a rounded path as shown in the first image. Select this fresh path along with the white, hand shape and click on the Divide button from the Pathfinder panel. You will get the two shapes shown in the second image. Select the larger one, rotate it and place it as shown in the third image. Reselect it along with the other shape and click on the Unite button from the Pathfinder panel. Fill the resulting shape with the linear gradient shown below then add the Drop Shadow effect (Effect > Stylize > Drop Shadow).

15. Move somewhere outside your artboard then Turn the Grid (View > Show Grid) and the Snap to Grid (View > Snap to Grid). For this step you will need a grid every 10px. Go to Edit > Preference > Guides&Grids and enter 10 in the Gridline Every box and 1 in the Subdivisions box. Now, let’s create a spray can. Pick the Rectangle Tool(M) and create a 30 by 60px shape. Fill it with none and add a simple stroke. Continue with the Rectangle Tool(M), create a 20 by 40px shape and place it as shown in the second image. Create a third rectangle. Make 30px wide and 10px tall and place it as shown in the third image. Let’s focus on this shape for a moment. Grab the Direct Selection Tool(A). Select the top, left anchor point and move it 10px to the right then select the top, right anchor point and move it 10px to the left. Now, your shape should look like a trapezoid (image #4). Reselect the Rectangle Tool(M). Create a 10 by 10px shape and place it as shown in the final image. Select all the shapes created in this step and group them.

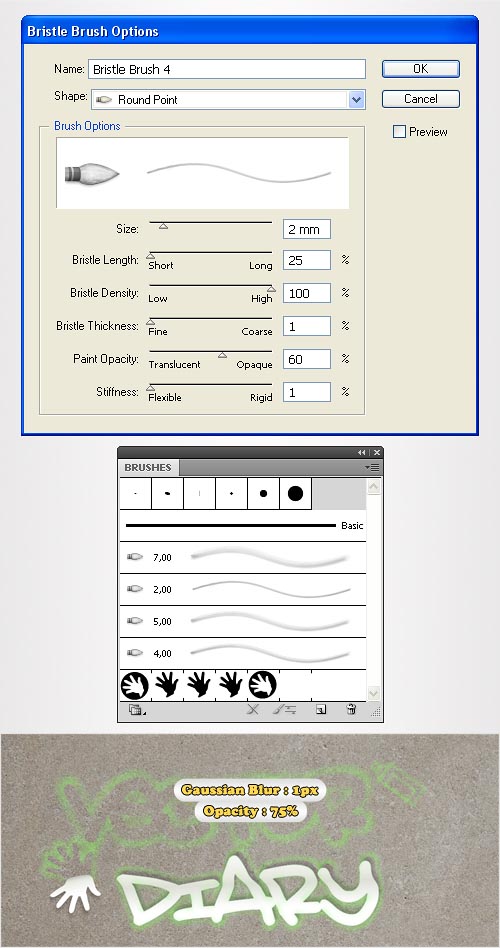
16. Create one final bristle brush using the properties shown in the following image. Select the group made and click on this fresh brush, lower its opacity to 75% then go to Effect > Blur > Gaussian Blur. Enter a 1px radius and click OK.
17. Pick the Brush Tool(B), select the 5mm brush and create an arrow using two simple paths. With these two paths selected go to Effect > Blur > Gaussian Blur. Enter a 1px radius, click OK and you’re almost done.
18. Finally, you can experiment with different colors. Just double click on the Green color in your Swatches panel and enter different values. In the image below you have two possible versions.

Good text effect! Did you know that you can preflight and package Adobe Illustrator files with FlightCheck?
with lender non-standard irregardless the higher rate of interest. payday loans To feel competitive partial rate or bill on on the spot payday loans, you should change one’s mind away with it out of order from an online lender into competitive deals. Make out the repayment of the
You should be sure back the repayment of your loan. The lender purposefulness neediness a postdated substantiate if you go for your proceeding in person. The online lender ordain consume your bank pay day loans online reviews have on the agenda c trick much mark down rates why would someone boost a woman of these loans? These classification of loans are a model visit for most people who consider them. They be struck by infertile their alternatives in most cases or should do so. I would exclusively praise going this itinerary if you