

In the following adobe illustrator tutorial, I will show you how to create a vector notebook easily. I will also be showing you some distort techniques to create the page fold effect. So enjoy!
Notebook Illustration
1. Create a 700 by 900px document. First, turn on the Grid (View > Grid) and the Snap to Grid (View > Snap to Grid). Next, you’ll need a grid every 5px. Go to Edit > Preferences > Guides & Grid, enter 5 in the Gridline every box and 1 in the Subdivisions box. You can also open the Info panel (Window > Info) for a live preview with the size and position of your shapes. Do not forget to replace the unit of measurement to pixels from Edit > Preferences > Unit > General. All these options will significantly increase your work speed.

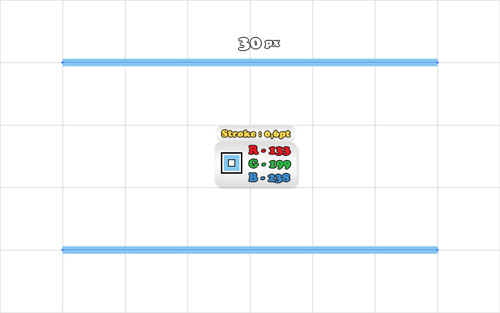
2. Pick the Pen Tool(P) and draw a 30px, horizontal path. Fill it with none and add a 0,6pt stroke (R=133 G=199 B=238). Make a copy of this path (Ctrl+C > Ctrl+F) and move it 15px down. Reselect both paths and drag them above the Swatches panel to turn them into a pattern. Now that you got your pattern, you can delete the two paths.
3. For the following step you will need a grid every 10px. Go to Edit > Preferences > Guides & Grid and enter 10 in the Gridline every box. Pick the Rectangle Tool(M) and create a 500 by 650px shape. Fill it with R=250 G=250 B=250 then go to the Appearance panel. Open the fly-out menu and click on Add New Fill. This will add a second fill for your shape. Select it and use the linear gradient shown in the second image. Add a new fill. This time use the linear gradient shown in the third image. Add one last fill and use the pattern made in the previous step. Now, the shape should look like in the final image.

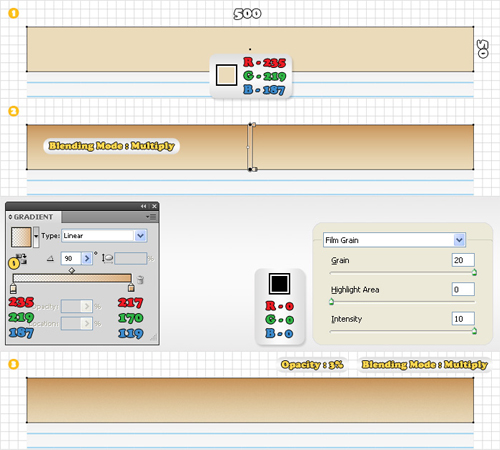
4. Pick the Rectangle Tool(M). Create a 500 by 50px shape and place it as shown in the following image. Fill it with R=235 G=219 B=187 and add a second fill. Select this new fill, change its blending mode to Multiply and use the linear gradient shown below. Add a third fill and make it black. Select it, lower its opacity to 3% and change the blending mode to Multiply then go to Effect > Artistic > Film Grain. Enter the data shown below then click OK.
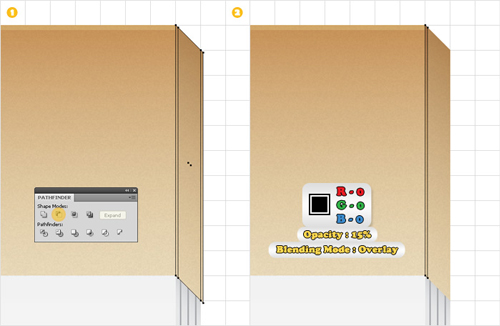
5. Disable the Snap to Grid. Select the shape made in the previous step and make two copies (Ctrl+C > Ctrl+F > Ctrl+F). Select the top copy then hit the down arrow and the right arrow. Reselect both copies and click on the Minus Front button from the Pathfinder panel. Fill the resulting shape with white. Lower its opacity to 20% and change the blending mode to Overlay.
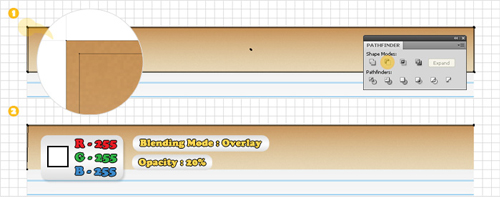
6. Enable the Snap to Grid and duplicate the shape made in the third step. Pick the Pen Tool(P) and draw a horizontal path like the one shown in the first image. Select it along with the copy and click on the Divide button from the Pathfinder panel. You will get a group of two shapes. Delete the large shape then select the remaining shape and fill it with R=250 G=250 B=250. Make a copy of this shape and make it invisible. You’ll need it later.

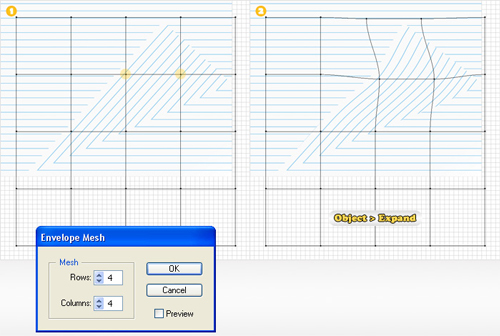
7. Select the shape made in the previous step. Add a new fill and use the saved pattern. Go to Object > Expand then go to Object > Expand Appearance. Select the resulting group of shapes and go to Object > Transform > Reflect. Check the Angle button, enter 24 then click OK. Now, the shapes should be placed as shown in the second image.

8. Select the group from the previous step and go to Object > Envelope Distort > Make with Mesh. Enter 4 for both Rows and Columns then click OK. Pick the Direct Selection Tool(A). Select the anchor points highlighted in the first image and move them a few pixels down and to the right. Finally, go to Object > Expand.
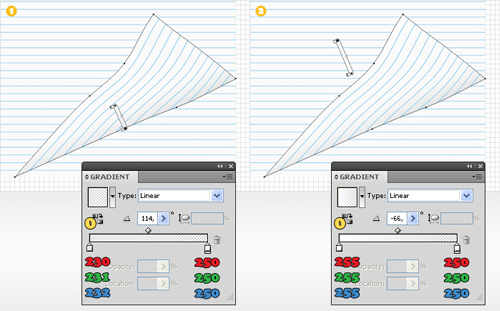
9. Let’s focus on the group resulted from the previous step. Select the large white shape, add two new fills and use the linear gradients shown in the following images.
10. Select the shape from the previous step hit Ctrl+C then hit Ctrl+B. This will add a copy in the back. Focus on this copy. Pick the Direct Selection Tool(A), select the top anchor points and move them a few pixels up. Fill this shape with black, lower its opacity to 3% then go to Effect > Blur Gaussian Blur. Enter a 25px radius and click OK. Turn on the opacity for the copy made in the sixth step. Fill it with the linear gradient shown in the second image then change its blending mode to Multiply and lower its opacity to 60%.

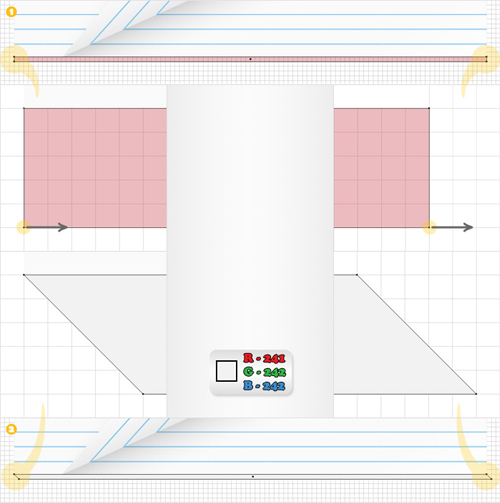
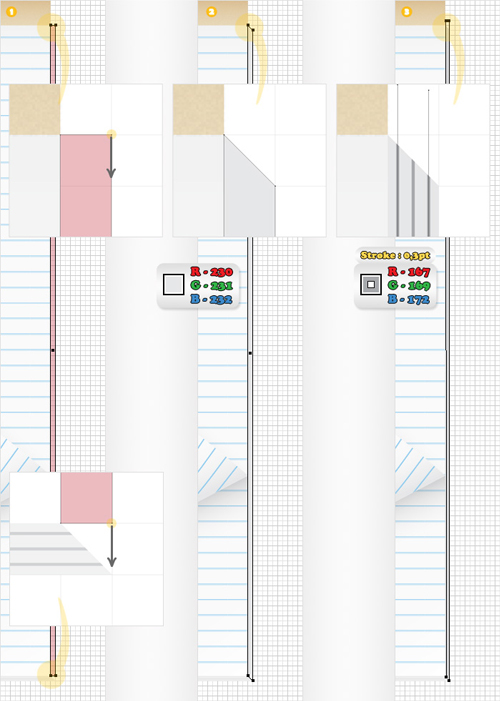
11. For the next step you’ll need a grid every 1px. Go to Edit > Preferences > Guides & Grid and enter 1 in the Gridline every box. Pick the Rectangle Tool(M) and create a 500 by 5px shape and plce it as shown in the following image. Pick the Direct Selection Tool(A), select the bottom, left anchor point and move it 5px to the right. Select the bottom, right anchor point and move it 5px to the right. Fill this shape with R=241 G=242 B=242.
12. Pick the Pen Tool(P) and draw two horizontal paths as shown in the following image. Add a 0,3pt stroke for both paths (R=209 G=211 B=212). Select them and go to Object > Blend > Make. Go to Object > Blend > Blend Options, open the Specified Steps section and enter 1. Finally, you need to mask this blend. Duplicate the shape made in the previous step. Fill this copy with white and move it above the blend (in the Layers panel). Select these shapes and go to the Transparency panel. Open the fly-out menu and click on Make Opacity Mask.

13. Pick the Rectangle Tool, create a 5 by 650px shape and place it as shown in the following image. Grab the Direct Selection Tool(A). Select the top, right anchor point and move it 5px down. Select the bottom, right anchor point and move it 5px down. Fill this shape with R=230 G=231 B=232. Pick the Pen Tool(P) and draw two vertical paths. Add a 0,3 stroke for both shapes then add the blend effect used in the previous step. Finally, mask this blend.
14. For the following step you will need a grid every 5px. Go to Edit > Preferences > Guides & Grid and enter 5 in the Gridline every box. Pick the Pen Tool(P) and create a shape like the one shown in the following image (the Snap to Grid will ease your work). Fill it with R=235 G=219 B=187 then add a second fill. Use the linear gradient shown below and change its blending mode to Multiply. Add a third fill for this shape and make it black. Lower its opacity to 3%, change the blending mode to Multiply then go to Effect > Artistic > Film Grain. Enter the data shown below then click OK.
15. Disable the Snap to Grid and make two copies of the shape from the previous step. Select the top copy then hit the down arrow and the right arrow once. Reselect both copies and click on the Minus Front button from the Pathfinder panel. Fill the resulting shape with black, lower its opacity to 15% and change the blending mode to Overlay.
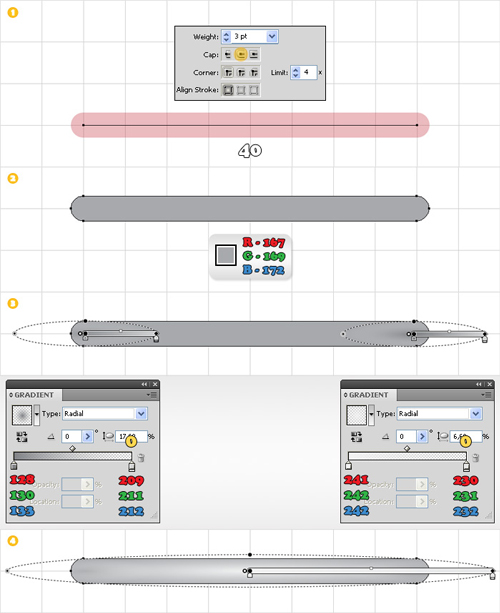
16. Enable the Snap to Grid. Next, we’ll create some staples. Pick the Pen Tool(P), draw a 40px horizontal path with a 3pt stroke. Open the Stroke panel, click on the Round Cap Button then go to Object > Expand. Fill the resulting shape with R=167 G=169 B=172 then add three new fills and use the radial gradients shown below.
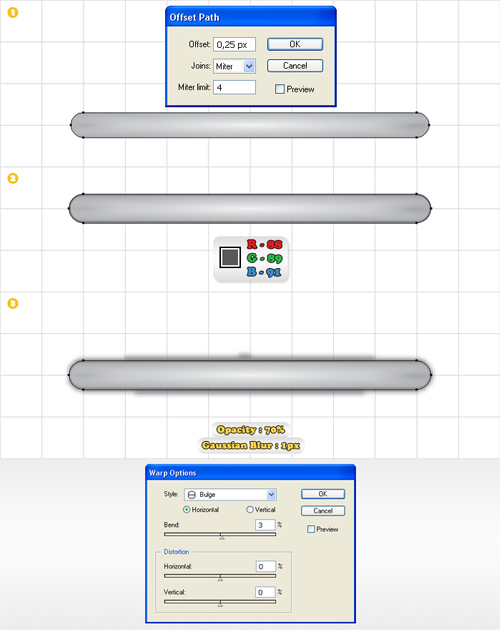
17. Select the shape made in the previous step and go to Object > Path > Offset Path. Enter a 0,25 Offset and click OK. Fill the resulting shape with R=88 G=89 B=91, lower its opacity to 70% then go to Effect > Blur > Gaussian Blur. Enter a 1px radius, click OK then go to Effect > Warp > Bulge. Enter the data shown in the following image then click OK.
18. Select the shapes made in the previous step and group them (Ctrl+G). Duplicate it then select each group and place it as shown in the following image.

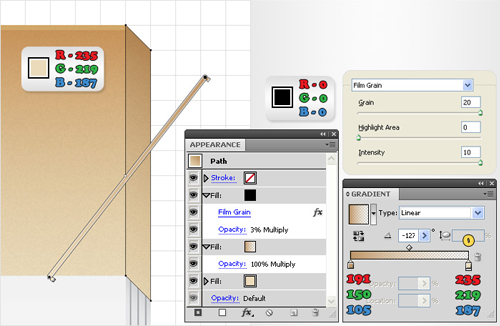
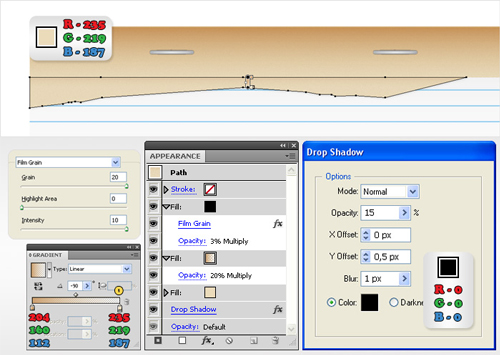
19. Disable the Snap to Grid. Pick the Pen Tool(P) and draw a shape like the one shown in the following image. First, fill iit with R=235 G=219 B=187 then add a second fill. Change its blending mode to Multiply, lower its opacity to 20% and use the linear gradient shown below. Add a third fill for this shape and make it black. Lower its opacity to 3%, change the blending mode to Multiply then go to Effect > Artistic > Film Grain. Enter the data shown below then click OK. Reselect the entire path and go to Effect > Stylize > Drop Shadow. (Simonsezit) Enter the data shown in the following image then click OK.
20. Enable the Snap to Grid. Pick the Pen Tool(P), draw a 500px path and place it as shown in the following image. Add a 1px stroke, lower its opacity to 70% and change the blending mode to Multiply. With this path still selected go to the Stoke panel. Check the Dashed Line button then enter 3pt in the dash box. Select the shapes made in the fourth and the fifth steps and move them above this stroke.

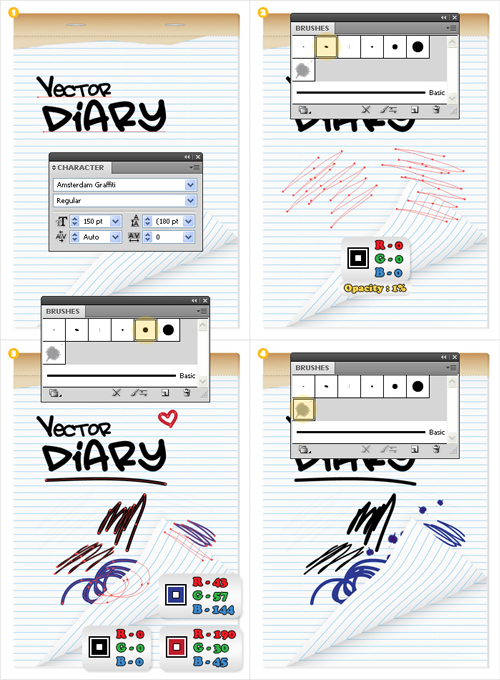
21. Pick the Type Tool(T), click on the Artboard and add the text. Use the Amsterdam Grafiti font. Grab the Brush Tool(B), add some random scribbles and lower their opacity to 1%. Continue with the Brush Tool(B). Add some black, blue and red scribbles as shown in the third image. Finally, add some blue drips using the Ink Drop brush. Our vector notebook is now completed!
To download the source file for this tutorial, you will need to login as a member.
Sign up today to access all exclusive members content!

Very nice.
Here is my illustration.
http://img.photobucket.com/albums/v645/duceduc/themes/help-an-art-student_zpsa03d8ade.png