

After studying this simple tutorial, you will learn many useful and necessary techniques that will help you to create a nice blue background. You will learn interesting techniques on how to use a very useful Mesh Tool, along with the basic shape tools, in order to create various abstract elements. Let’s get started!
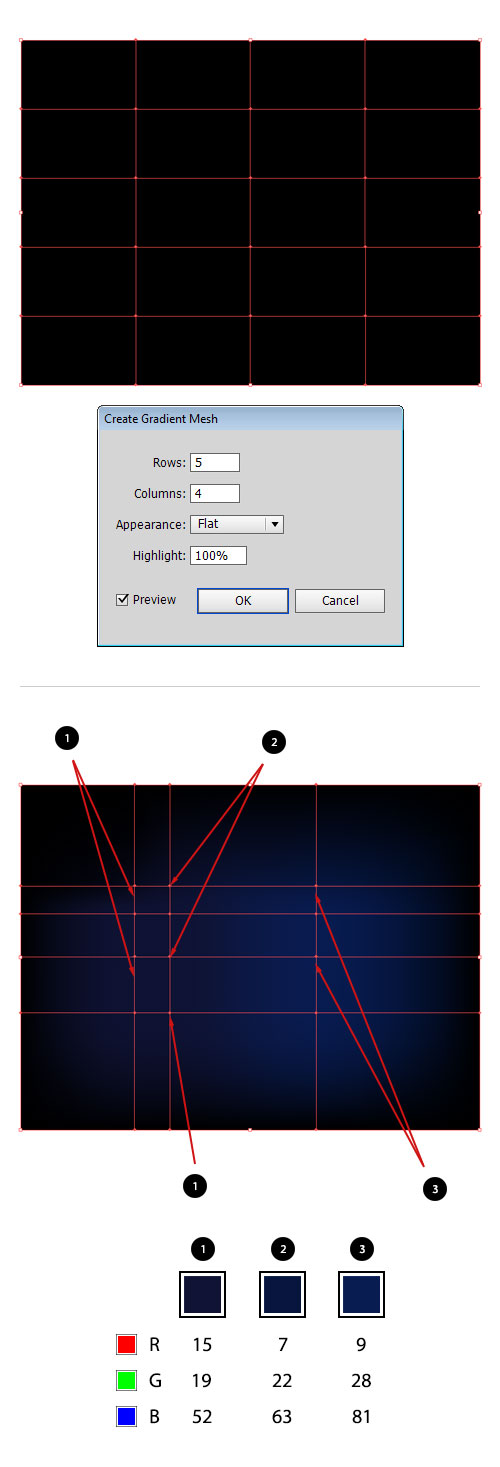
1. Open up a new document and set the dimensions of the Artboard to about 800 x 600px. Now grab the Rectangle Tool (M) and make a rectangle that is the same size as your artboard. While the object is still selected, choose the black (R=0, G=0, B=0) in the Color panel to set the fill color.

2. Keep the background selected and choose Object > Create Gradient Mesh option. Once done, a dialog box will appear on your screen. In the ‘Rows’ text field type 5 and in the ‘Columns’ text field type 4. Leave the other settings at their defaults and hit OK. Use the Direct Selection Tool (A) for grid line distortion and movement of the nodes. Now pick the colors from the Color Panel as shown in the image below.
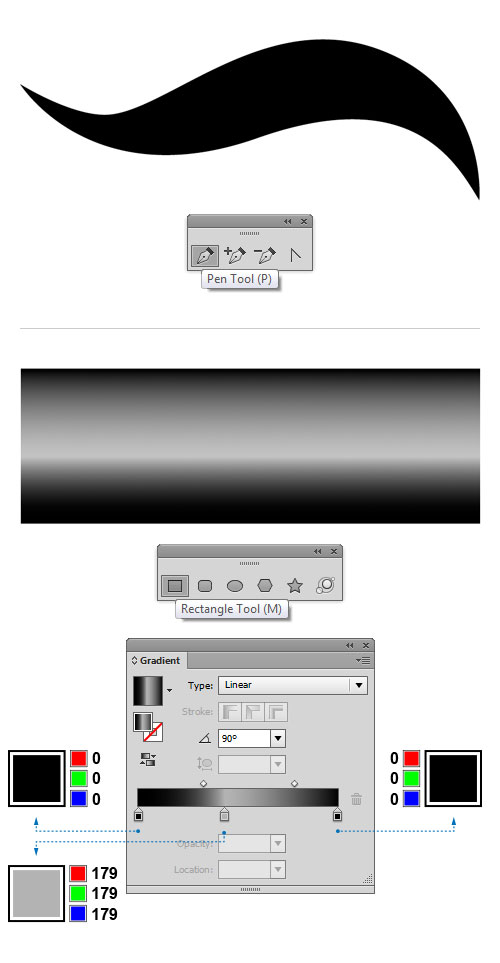
3. It’s time to create our first background element. Grab the Pen Tool (P) from the Tools Panel and draw a black wavy shape, as shown below. The dimensions should be set to about 800 x 280px. Then, using the Rectangle Tool (M) create a rectangle whose dimensions match the size of the previous object. Open up the Gradient Panel and fill the resulting shape with linear gradients: black (R=0, G=0, B=0), medium grey (R=179, G=179, B=179) and black (R=0, G=0, B=0), as shown below.
4. Select the wavy object again. Using the Bring to Front (Shift+Ctrl+]) command, we can place the selected object on top in the vertical stacking order when those objects overlap. Select both objects, and go to Object > Envelope Distort > Make with Top Object. To modify the settings, click on the Envelope Options icon at the top left of the screen and the dialog box will appear. Once done, enter the values shown on the image below and click OK. Place the resulting shape in the middle of our background (refer to the image). In the Transparency panel change the Blending Mode to Color Dodge (Opacity 100%).

5. Let’s create another background element. We can use a different approach to achieve the same effect that we have previously presented. Grab the Pen Tool (P) and create a long curved black path. Keep the path selected, and in the Stroke Panel choose the ‘Width Profile 1’, to change the Variable Width Profile of the stroke. Set the Stroke Weight to about 40pt. Then go to Object > Expand Appearance to expand the object. If there are too many anchor points, we can simplify the path by removing excess anchor points. First, choose Object > Path > Simplify to open the dialog box. Once the dialog box appears, apply the shown values and hit OK.

6. Select the Mesh Tool (U) from the Tools Panel and add a mesh line by clicking on the shape. If you decide to go into more detail, you can add as many mesh lines as you want. In this particular case, I have created two vertical and three horizontal mesh lines. Grab the Lasso Tool (Q) and draw around all the mesh points that you want to select and then apply the colors. Do the same for the rest of the mesh points. If you want, you can easily make the adjustments by pulling some control handles. Keep the object selected, and in the Transparency Panel change the Blending Mode to Color Dodge (Opacity 100%). When you’re done, you should end up with something similar to the image below. Using the same techniques described before, create several different paths and arrange them all over the background.

7. Adobe Illustrator CS6 has a new feature which is called Gradient on Strokes. Now we have an opportunity to apply the gradient fills to the strokes. First, create a shape using the Ellipse Tool (L) and apply only a stroke to the object (set fill to none). The Stroke Weight should be set to about 15pt. Pick the Scissors Tool, which can be found in the fly-out menu of the Eraser Tool, and click two points on the stroke. This way, we split the stroke into two open paths. Select the part we do not need and get rid of it (refer to the image). While the object is still selected, open up the Stroke Panel and select the ‘Width Profile 4’, that will automatically apply a given style to the line.

8. When you’re done, activate the Gradient Panel and fill the resulting shape with linear gradients: white (R=255, G=255, B=255) and medium grey (R=153, G=153, B=153). Now apply the gradient across the stroke by clicking a third icon in the Gradient panel. In the Transparency Panel, change the Blending Mode to Color Dodge (Opacity 100%). Make several copies of the object we have just created and position them as shown below.

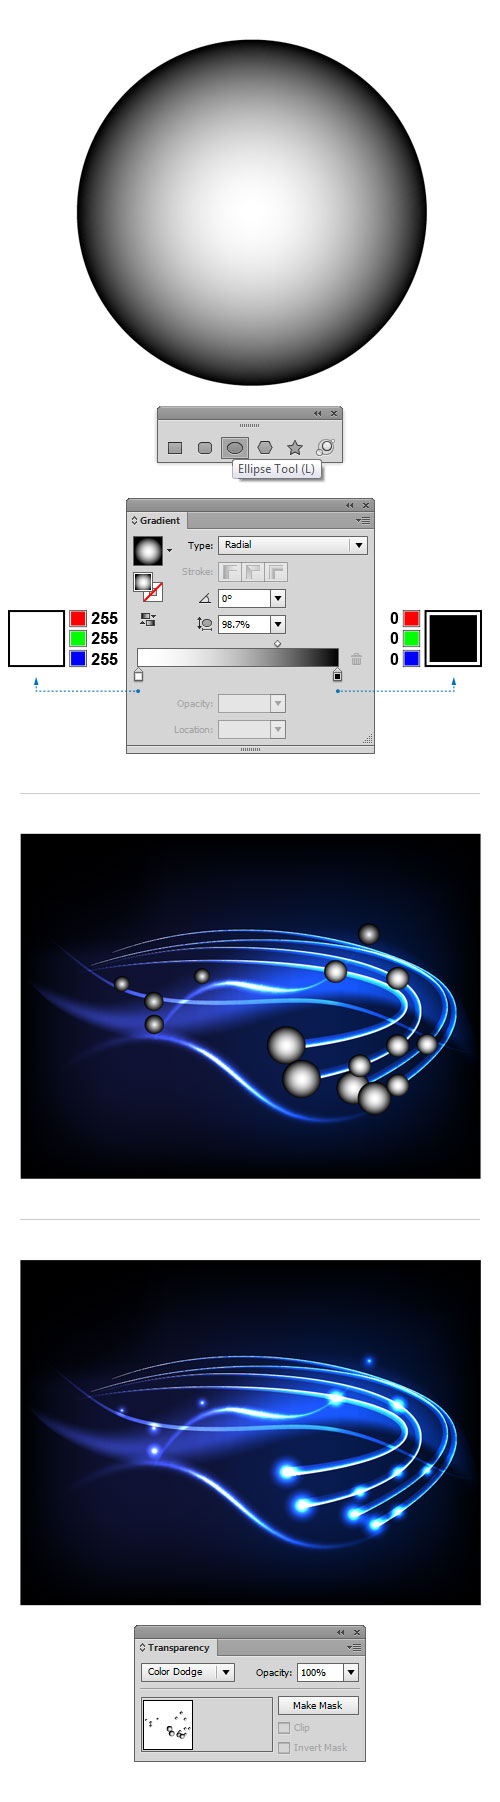
9. We are going to create a new background element. Grab the Ellipse Tool (L) and draw several circles in different sizes. Open up the Gradient Panel and fill the resulting shapes with radial gradients, white (R=255, G=255, B=255) and black (R=0, G=0, B=0), as shown below. Select all circles, and in the Transparency Panel set the Blending Mode to Color Dodge (Opacity 100%). Now arrange the objects all over the background.
10. Grab the Pen Tool (P) and draw a long wavy horizontal line, as shown below. Then, go to the Gradient Panel and fill the stroke with the following linear gradients: dark grey (R=77, G=77, B=77) and white (R=230, G=230, B=230). Make a copy of the previous object and nudge it to the right a bit. If you want, you can even edit gradients by adding, deleting, or changing colors in the Gradient Panel. Select both objects, and go to Object > Blend > Make (Alt+Ctrl+B) to multiply the objects. To modify the settings, double-click on the Blend Tool (W) from the Tools Panel, in order to open the Blend Options. Select Specified Steps from the Spacing drop-down menu, type 15 and confirm with OK. Open up the Transparency Panel and change the Blending Mode to Color Dodge (Opacity 100%). We’re done with the tutorial now. I hope you like it.
View the list of all 101 Illustrator special effects tricks at 101 Illustrator Special Effects.
