
Let’s see how to create a colorful mosaic background in this tutorial. You will learn interesting techniques on how to use various symbolism tools, along with Mesh Tool, in order to achieve a nice mosaic effect. So, let’s get started!
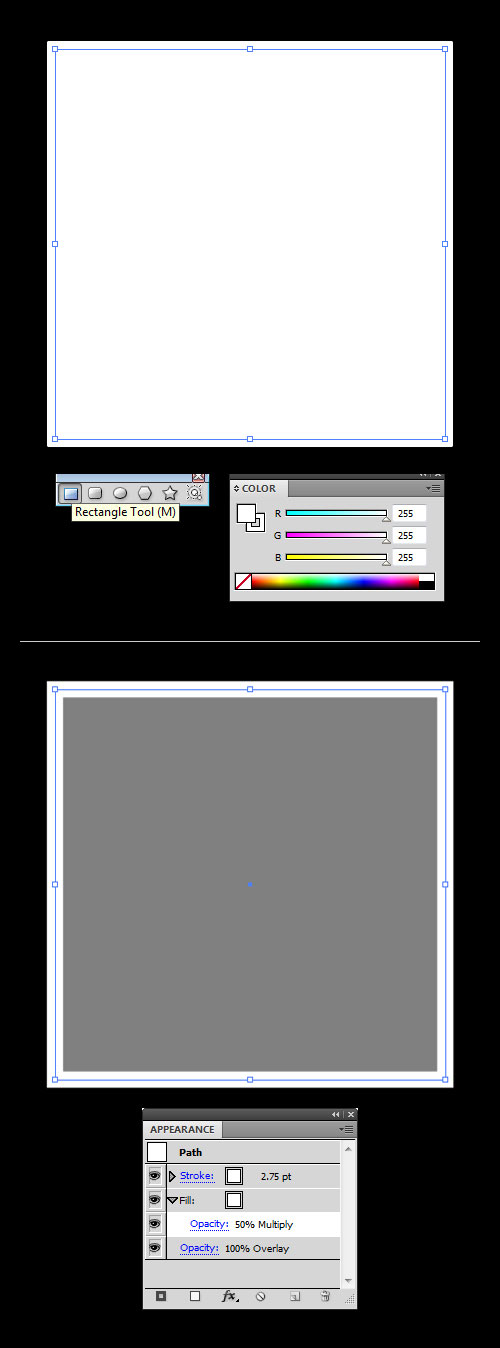
1. Open up a new document and set the dimensions of the Artboard to about 800 x 600px. Pick the Rectangle Tool (M) from the Tools Panel and make a rectangle with the following dimensions: width – 800px, height – 480px. Keep the object selected, and choose the black (R=0, G=0, B=0) in the Swatches panel to set the fill color.

2. Select the background we have just created and go to Object > Create Gradient Mesh… to open a dialog box. Once done, in the “Rows” text field type 6 and in the “Columns” text field type 10. Leave the other settings at their defaults and press OK. Use the Direct Selection Tool (A) for grid line distortion and movement of the nodes. Now pick the colors from the Color Panel as shown in the image below.

3. Let’s create a nice glowing light effect now. Grab the Rectangle Tool (M) and create a rectangle whose dimensions should be set to about 65 x 65px (hold Shift to constrain the proportions). Now go to the Color Panel and set the fill and stroke color to pure white (R=255, G=255, B=255). Open up the Stroke Panel and set the Stroke Weight to 2.75pt. In the Appearance Panel, click on the toggling arrow on the left to reveal the content of the “Fill” attribute. Make sure the Blending Mode of that specific attribute is set to Multiply (Opacity 50%). Once done, in the Transparency Panel change the Blending Mode of the object to Overlay (Opacity 100%). (westchestermachinery.com)
4. Keep the shape selected and in the Symbols Panel click on the New Symbol button. When the Symbol Options appear, give the symbol a name, in this case “White Rectangle”. Select the symbol type as “Graphic” and confirm with OK. Grab the Symbol Sprayer Tool (Shift+S) and pick our new symbol from the Symbols Panel. Just click and drag, release the mouse when you think that there are enough symbol instances. The symbol set of instances appears in a bounding box (refer to the image).
Note: You can customize the way the Symbol Sprayer Tool works by setting options in the Symbolism Tools Options dialog box. You can also customize several other symbolism tools that we’ll use later on. Double-click the Symbol Sprayer Tool in the Tools Panel and adjust the settings to your wishes. This can be a bit tricky and you might need to experiment a bit to find the setting that fits your purpose.

5. You can manipulate the symbols in a number of ways. First, we are going to use the Symbol Sizer Tool. This tool allows you to resize individual instances within the symbol set. To locate the tool, click on the Symbol Sprayer Tool in the Tools Panel and hold the button down. A fly-out menu will appear with a list of choices. Choose the Symbol Sizer Tool option from the menu. While the symbol set is still selected, simply click and hold or drag inside the symbol set to enlarge instances. To reduce instances, hold down the Alt key while dragging across the symbol set. When done, you should end up with something similar to the image below.

6. Another handy tool is the Symbol Spinner Tool. We’ll use this tool to change the orientation of individual instances in the symbol set. Select the Symbol Spinner Tool from the Tools Panel and click and drag from side to side to spin the symbols around. If you want a bit more control over the symbols you are working on, you can make the diameter of the tool”s brush smaller or larger using the square bracket shortcut keys ( [ to decrease your brush size / ] to increase your brush size).

7. We”ll need another symbol set. To simplify things, let”s make a copy of the symbol set we have created in the previous steps. First, make sure the symbol set is still selected. Then, go to Object > Transform > Reflect… and reflect it along the vertical axis, and hit Copy.

8. Let’s create a mosaic effect now. Select all objects and go to Object > Rasterize… to open a dialog box. In the Color Model drop-down menu choose RGB mode and set the Resolution to High (300ppi). Now check the Transparent box, set the Anti-aliasing option to Art Optimized (Supersampling) and hit OK. Then, go to Object > Create Object Mosaic… and the dialog box will appear. We need to change only two values. First, in the “Number of Tiles” section set the width to 36 and hit Use Ratio, in order to make the tiles square. Check Delete Raster in the “Options” section and hit OK.

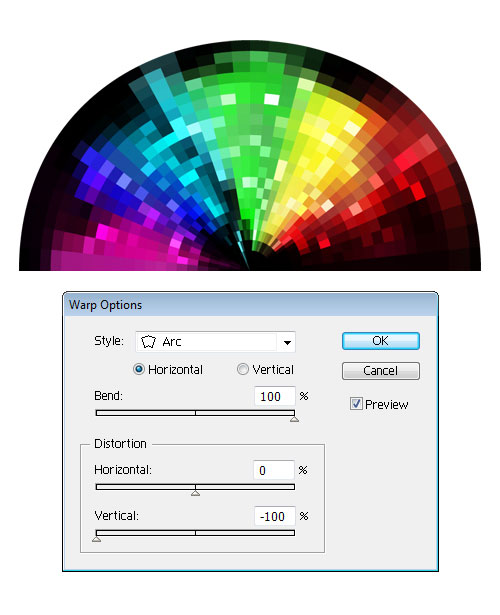
9. Here’s the interesting part. Keep all the objects selected, and go to Effect > Warp > Arc… and the dialog box will appear. In the Style drop-down menu choose “Arc” option and check “Horizontal”. The “Bend” slider should be set to 100%. In the Distortion section keep the “Horizontal” at its default value and set the “Vertical” slider to -100%.
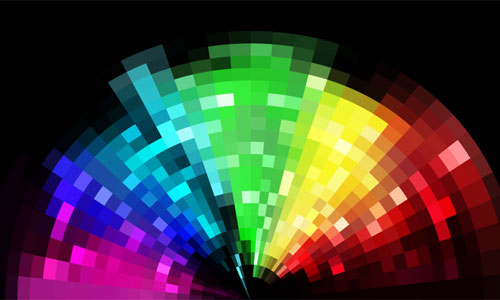
10. Grab the Rectangle Tool (M) and create two black rectangles, whose dimensions should be set to about 800 x 480px. Select one of these two rectangles and use Send to Back (Shift+Ctrl+[) command, in order to set the background for our effect. Then, choose another rectangle and use Bring to Front (Shift+Ctrl+]) command, to place the object on top of the other objects. Select all objects created so far, and go to Object > Clipping Mask > Make (Ctrl+7) to mask out the parts that exceed the boundaries of the rectangle. We’re done with the tutorial now. I hope you like it.
View the list of all 101 Illustrator special effects tricks at 101 Illustrator Special Effects.
