

Hello everyone, today I’m teaching you a nice tutorial which is very useful for every designer. I would show you with the help of this tutorial how you can make a nice globe with binary code on it. I will also show you how to create a stunning sunburst effect with the globe. So let’s get started.
Making the Background
1. In this image you can see 3 important parts – background, sunburst effect and globe. We will start with creating the background. Take a new file and make the artboard size of the file same as below.

2. Make a black box on the artboard.
3. Select the Mesh tool from the artbox.

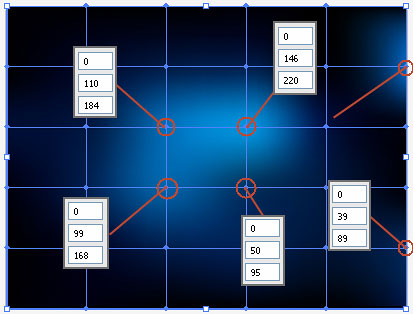
4. Select the black box and go to Object > Envelope Distort > Make with Mesh. A window will appear in front of you, put the values shown below in this window.

5. After putting the mesh some boxes are created which are individually selectable. You can select the nodes by the mesh tool and fill the color shown below.
6.Now make a circle and fill it with the gradient color. Gradient color value is given in the image below.

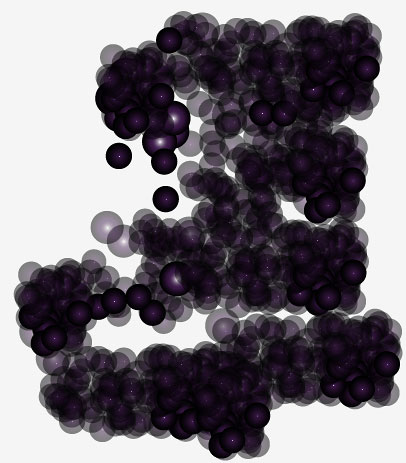
7. Now copy this circle at many places as shown in the image below.

8. Keep on copying till a big group is made.
9. Now select the whole group and go to transparency box and give this group Color Dodge effect, as shown in the image below.

10. Now place this group over the black box.

11. Make one more box of the artboard size and fill it with the gradient color given below.

12. Place this box over the background

Creating Sunburst Effect
13. Lets start the work on sun burst effect. First make a circle over the background.

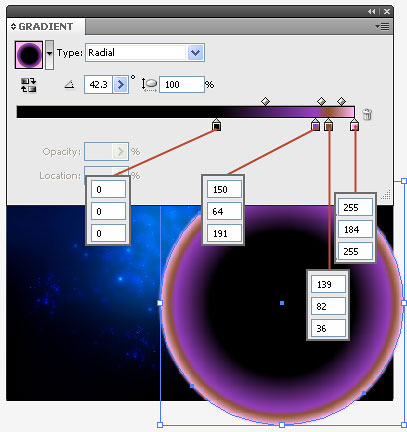
14. Fill this circle with the gradient color shown below.
15. Now make one more circle over this gradient circle and its value is given below.

16.Select the circle and go to Effect > Blur > Guassian Blurr. A window will open in front of you. Put the values shown below in it.

17. By doing this, the shape will get a blur effect.

18. Place this blurred circle under the gradient circle. Do this by pressing Ctrl+shift+{.

Making Globe Text Layer
19. So let’s working on the important part of this image i.e globe. To make the globe first make a circle.

20. Fill this circle with the gradient color shown below.

21. Copy this circle and fill the copied cirle with 10% gray color

22. Now make a box in half part of the circle as shown in the image below.

23. Go to windows and open pathfinder window and select the option given below

24. By doing this, the circle will be divided in two parts

25. Make a pattern of boxes.

26. Convert this pattern in the symbol

27. When you select new symbol option a window will open in front of you, insert the values shown below in that window.

28. So this way our pattern symbols will appear in the window and will completely turn into a graphic symbol

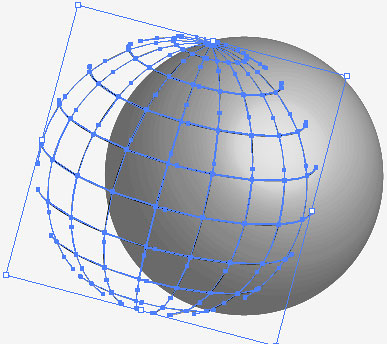
29.Let’s go to that half circle and select it then go here, Effect > 3D > Revolve.

30. A window will open in front of you, put the values shown below in it

31.When you click on the map art in this window one more window will open in front of you. Select all the options shown below in this window and then press ok

32. By doing this our pattern will rotate all round the circle, as you can see in the image below.

33.Select this circle and expand it. Go here to expand it Object > Expand Appearance. By doing this the circle will expand itself and will get separated from the pattern.
34. Now place this pattern over the blue circle.

35. After placing the pattern, fill it will gradient color as shown below.

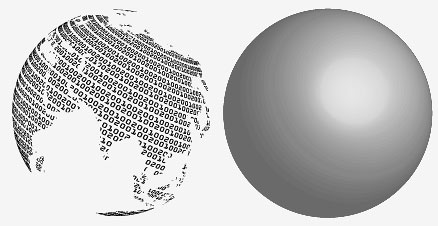
36. Now draw an oval shape and fill it with normal gradient color. It should be a gradient from white to black.

37.Place this shape over the previous blue globe.

38. Open the transparency window and choose the option given below.

39. Select text tool from the toolbar

40. Type a pattern from this tool. You can use any font.

41. Download a world map from the internet and trace it.

42. Place this map over the text pattern and clip it. Select both shapes and press Ctrl+7 then go to Object > Clipping Mask > Make.

43. Now convert this pattern in symbol.

44. After converting this shape to symbol, it will appear in the Symbols window.

45. Map the symbol on the circle using Map Art.

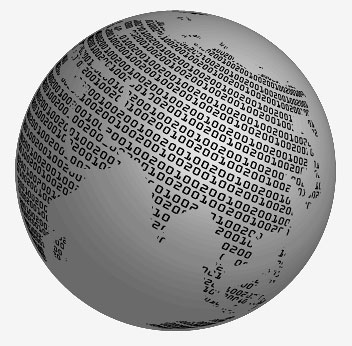
46. After mapping, it will appear like this.
47. Expand this pattern and seperate it from the circle.
48. Now place this pattern over the blue circle and fill it with white color.

49. Our globe is ready and complete. Place this globe over the background.

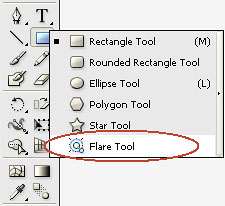
50. Go to Toolbox and select the Lens Flare Tool.
51. With this tool draw lens flare effect on the globe.

52. Putting the lens flare will give the sun burst effect behind the globe.

53. Now draw a box with the size of art board over this whole artwork.

54. Mask the artwork with this box to frame it in the rectangle. The globe is now ready.

To download the source file for this tutorial, you will need to login as a member.
Sign up today to access all exclusive members content!
