
In this detailed tutorial, we’ll be learning how to create a shoe lace text effect using Adobe Illustrator. For beginners, you will learn how to create a shoe using the Pen Tool along with some vector shape building techniques and several effects (Gaussian Blur, Drop Shadow). Next, you will learn how to create the lace text using again the Pen Tool and some other basic tools. In this part, combination of linear and radial gradients can be very useful for achieving nice results in creating realistic vector illustrations. Let’s begin!
Open a New Document
1. Launch Illustrator and press (Ctrl + N) to create a new document. Select Pixels from the Units drop-down menu, enter 786 in the width box and 500 in the height box then click on the Advanced button. Select RGB, Screen (72ppi) and make sure that the Align New Objects to Pixel Grid box is unchecked before you click OK.

Create a Shoe
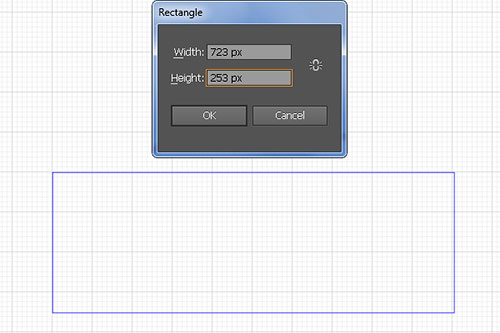
2. Start by drawing a 723px by 253px using the the Rectangle Tool (M). Next, pick the Pen Tool (P) and create an object as shown in the second image.
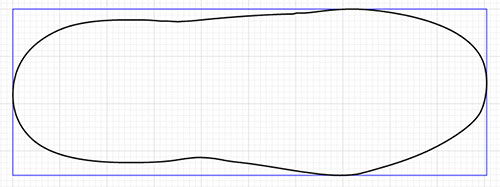
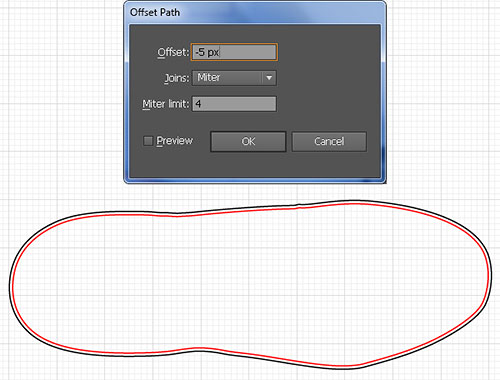
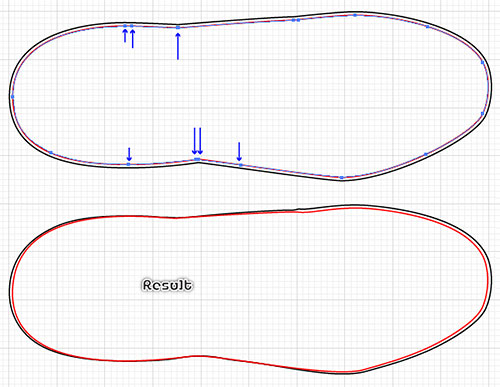
3. Once your new object is drawn, reselect it and go to the Object > Path > Offset Path. Enter a -5px Offset and click OK. Keep the new object selected. Pick the Direct Selection Tool (A), select anchor points highlighted with the blue arrows and move them a bit. Follow the direction of these arrows. Your object should look roughly like the third image.
4. Select the black object and fill it with the linear gradient as shown below. Keep the resulting shape selected. Go to the Effect > Stylize > Drop Shadow. Follow the data as seen in the second image and then click OK.


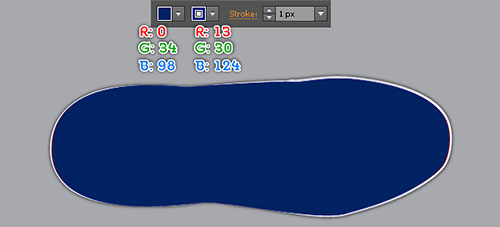
5. Fill the red object with R=0, G=34, B=98 and add a 1px stroke (R=13, G=30, B=124). Make sure that the resulting shape is still selected, duplicate (Ctrl +C, Ctrl +F) it and then go to the Effect > Texture > Texturizer. Follow the data as shown in the second image and click OK. Next, set the Blending Mode of the result to Lighten and reduce the Opacity to 20%.

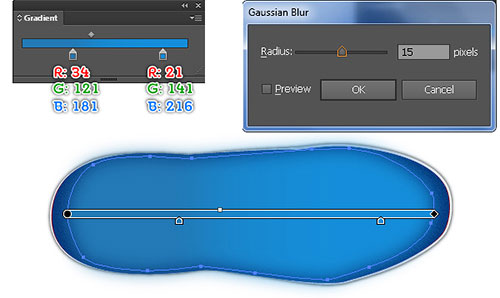
6. With the help of the Pen Tool (P), create an object as shown below. Once your object is drawn, fill it with the linear gradient, then go to the Effect > Blur > Gaussian Blur. Enter a 15px Radius and click OK. Now select the blue shape (which do not have the blur effect) created in step 5. Duplicate (Ctrl +C, Ctrl +F) and bring it to the front. Keep this selected. Hold down the Shift key and click on the shape with Gaussian Blur effect, then go to the Object > Clipping Mask > Make (Ctrl +7). Make sure that the result is still selected and press (Ctrl +Left Square Bracket) once to send it backward.



7. With the help of Pen Tool (P), draw an object and fill it with the radial gradient as shown below.


8. Continue working with the Pen Tool (P). Draw an object as seen in the image below. Next, fill this object with the linear gradient and add a 1px stroke (apply the radial gradient within stroke). Keep the resulting shape selected. Go to the Object > Path > Offset Path. Enter a -4px Offset and then click OK. Make sure that the new shape is still selected. Remove the fill color and replace the existing stroke color with R=188, G=190, B=192, then open the Stroke palette (Window > Stroke). In the Stroke palette, check the Dashed Line box. Enter 4px in the dash box and 6px in the gap box. Now select thetwo objects created in this step and press (Ctrl +Left Square Bracket) to send them backward.


9. With the help of the Pen Tool (P), create three curved paths as shown below. Once your paths are drawn, select the yellow path, fill it with none and add a 1px stroke (apply the radial gradient within stroke). Next, apply the Width Profile 3 for the result. Now select the two red paths, pick the Eyedropper Tool (I) and click on the dashed line path created in step 8.


10. Select the shape created in step 7 and go to the Object > Path > Offset Path. Enter a 7px Offset and then click OK. Remove the fill color of the new shape and add a 1px stroke (green), then hide the result (Ctrl +3). Next, reselect the shape created in step 7 and duplicate it. Replace the existing color of it with the new radial gradient. Make sure that the resulting shape is still selected and go to the Effect > Texture > Texturizer. Follow the data as shown in the second image and click OK. Finally, set the Blending Mode of the resulting shape to Multiply and reduce the Opacity to 20%.

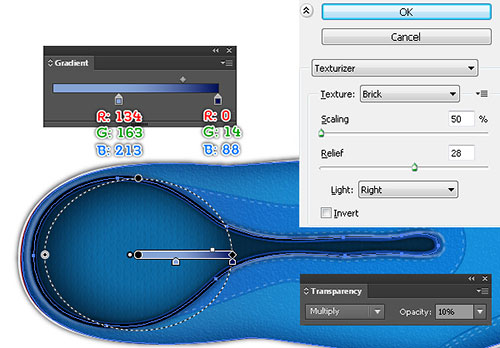
11. Select the new shape created in step 10. Duplicate it and go to the Appearance palette (Window > Appearance), then remove the Texturizer effect. Next, remove the fill color of the resulting shape and add a 8px stroke (apply the linear gradient across stroke). Keep the result selected and go to the Effect > Stylize > Outer Glow. Follow the data as shown in the second image and then click OK.


12. Make a duplicate (Ctrl +C, Ctrl +F) of the new object created in step 11 and remove the Outer Glow effect of it. Next, change the stroke weight of the resulting object to 6px and apply the Width Profile 1 for the result, then change the Blending Mode to Difference.

13. Make a duplicate (Ctrl +C, Ctrl +F) of the new object created in step 12. Replace the existing stroke color of it with R=149, G=183, B=238 and change the stroke weight of the resulting object to 3px, then change the Blending Mode to Normal. Next, pick the Add Anchor Point Tool (+) and add two anchor points highlighted with green. Reselect the two newly created anchor points and click on the “Cut path at selected anchor points” button from the Properties bar. This will create two new objects. Let’s select the right side object and remove it. Now reselect the remaining object and go to the Effect > Blur > Gaussian Blur. Enter a 2px Radius and click OK. While the resulting object is selected, press (Ctrl +Left Square Bracket) twice to send it backward.


14. Press (Ctrl +Alt +3) to show the object hidden in step 10. Next, add two anchor points highlighted with white for the green object, then select the two new anchor points. Click on the “Cut path at selected anchor points” button from the Properties bar. This will create two new paths. Let’s select the left side path and remove it. Now reselect the remaining path, pick the Eyedropper Tool (I) and click on the dashed line path created in step 8.

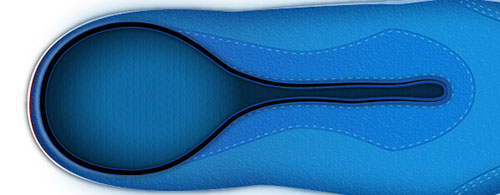
15. With the help of the Pen Tool (P), create two paths as shown below. Once your paths are drawn, reselect these paths and fill them with none, then add a 1px stroke (R=136, G=172, B=224). Next, apply the Width Profile 2 and 1px Gaussian Blur effect for the resulting objects. Continue working with the Pen Tool (P) to create an object and fill it with the linear gradient as seen in the third and fourth images below.


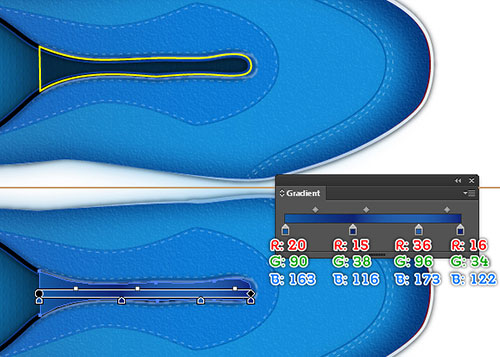
16. Using the Ellipse Tool (L), create a 7px by 7px object and fill this ellipse with R=27, G=9, B=4, then apply a 2px Feather effect for the resulting shape. Next, make five duplicates of the new shape and place six ellipses to the positions as shown below. Select the six new ellipses and group (Ctrl +G) them, then go to the Object > Transform > Move. In the Move palette, enter a 12px in the Horizontal and click Copy, then press (Ctrl +D) several times to get the result as seen in the second image. Next, select all the newly created groups and group (Ctrl +G) them again. Now select the shape created in step 15. Duplicate (Ctrl +C, Ctrl +F) and bring it to front (Ctrl +Shift +Right Square Bracket). Keep the new shape selected. Hold down the Shift key and click on the new group, then go to the Object > Clipping Mask > Make (Ctrl +7).


17. Draw two objects with the help of Pen Tool (P). Once your objects are drawn, select the green object and fill it with the linear gradient. Next, select the yellow object and fill it with the linear gradient, then go to the Effect > Texture > Texturizer. Follow the data as shown in the fifth image and click OK. Next, apply a 3px Feather effect for the resulting shape and reduce the Opacity to 90%. Now select all the objects created from step 16 up to this time and the shape created in step 15, then group (Ctrl +G) them. Finally press (Ctrl +Left Square Bracket) several times to send the new group backward.


Create the Shoelace
18. With the help of the Pen Tool (P), create two curved paths as shown below. Next we’ll create a segment of the shoelace based on the two newly created curved paths. Continue working with the Pen Tool (P) and create an object as you can see in the third image. Once your object is drawn, fill it with the linear gradient as shown in the fourth image.


19. Keep working with the Pen Tool (P). Create two objects and fill them with the linear gradients as seen in the images below. Next, select the red and green curved paths created in step 18 and remove them.


20. Now, follow the sequence of images and repeat the process in the previous steps to create another segment of the shoelace.


21. With the help of the Pen Tool (P), create two curved paths as shown below. Once your paths are drawn, select two anchor points highlighted with yellow and click on the “Connect selected end points” button from the Properties bar. Next, select the two anchor points highlighted with white and connect them. Finally, fill the new object with the linear gradient as shown in the fifth image.


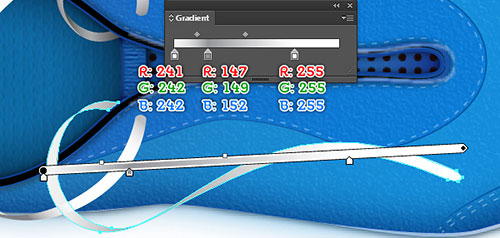
22. To add details, first draw two curved paths as shown below. Once your paths are drawn, select the green path, fill it with none and add a 2px stroke (apply the linear gradient within stroke). Next, select the remaining path, fill it with none and add a 2px stroke (apply the linear gradient within stroke).

23. Now, follow the sequence of images and repeat the process in the previous step to add details for the other segments of the shoelace..


24. Now we’ll work with the lace tips. With the help of the Pen Tool (P), draw two paths as shown below. Once your paths are drawn, fill them with none and add a 5px stroke (apply the linear gradient across stroke).
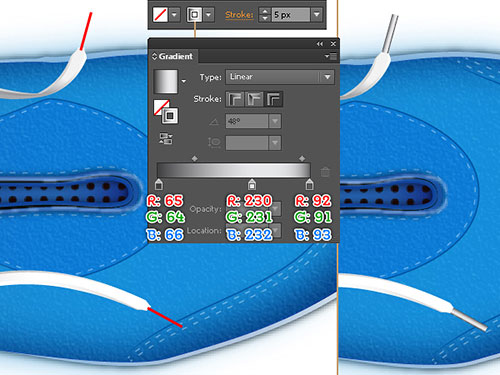
25. Select all the objects as shown in the first image and group (Ctrl + G) them. Go to the Effect > Stylize > Drop Shadow. Follow the data as seen in the second image and click OK.

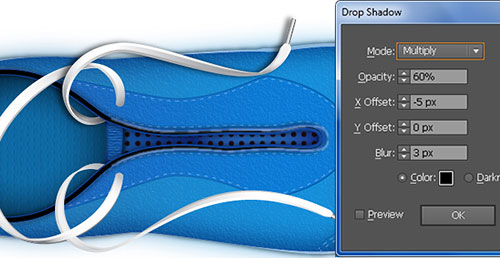
26. Now, follow the sequence of images and repeat the process in the previous steps for the other segments of the shoelace. Your artwork should look roughly like the final image.


27. With the help of the Pen Tool (P), create objects as seen in the image below. We’ll create the other segments of the shoelace based on these newly created objects. Once your objects are drawn, begin by drawing a red object using the Pen Tool (P) as shown in the second image. Next, fill this object with the linear gradient as seen in the third image. Continue working with the Pen Tool (P). Create another red object and fill it with the linear gradient as shown in the fourth and fifth images.


28. Repeat the process in the previous steps and follow the sequence of images to create the other segments of the shoelace.


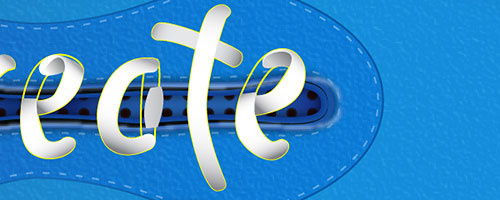
29. To add some details for the new segments of the shoelace, first draw two curved paths as shown below. Once your paths are drawn, select the red path, fill it with none and add a 1px stroke (apply the linear gradient within stroke), then apply the Width Profile 3 for the result. Next, select the remaining path, fill it with none and add a 2px stroke (apply the linear gradient within stroke), then apply the Width Profile 1 for the result. Finally, reselect the two newly created objects and press (Ctrl +Left Square Bracket) several times to send them backward.


30. Continue to create the two other curved paths and set the data for them as seen in the second image.


31. Select all the objects as shown in the first image and group (Ctrl + G) them. Next, select all the objects as shown in the second image and group (Ctrl + G) them. Now select the two newly created groups and go to the Effect > Stylize > Drop Shadow. Follow the data as seen in the third image and click OK.


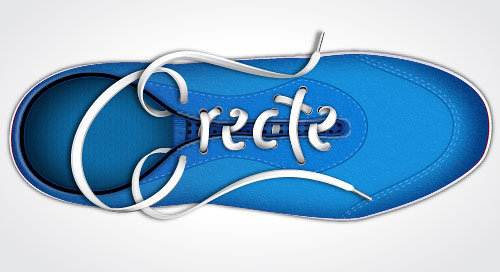
32. Now, follow the sequence of images and repeat the process in the previous steps for the other segments of the shoelace. Your artwork should look roughly like the final image.


33. Now we need holes for the shoelaces. With the help of the Ellipse Tool (L), create a 13px by 13px object and fill this ellipse with R=189, G=171, B=172. Continue working with the Ellipse Tool (L), create a 11px by 11px object and fill this ellipse with R=45, G=27, B=38. Now select the two newly created ellipse shapes and group (Ctrl +G) them, then hide this group behind the shoelaces.


34. Make somes duplicates of the “hole” group and place them to the positions highlighted with red ellipses. Send these “hole” groups behind the shoelaces. At this point, your artwork should look like the third image below. Finally, select and group (Ctrl +G) all the shapes created from step 2 up to this time.


35. It’s time to create a background. With the help of the Rectangle Tool (M), create a 786px by 500px object and fill it with the radial gradient as shown below. The last thing to do is place the “shoe” group to the position as seen in the second image. Now we are done with the shoelace text effect. I hope you liked the tutorial. Thanks for reading!

To download the source file for this tutorial, you will need to login as a member.
Sign up today to access all exclusive members content!

