

The well-known LEGO plastic parts offer endless possibilities to create all types of objects. This Adobe Illustrator tutorial will show you how to digitalize your toys and build a vector logotype for your favorite website without running out of bricks.
Setting up the Grid
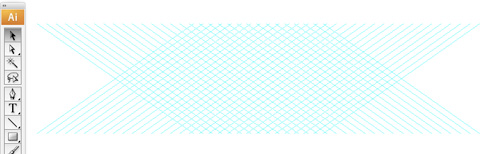
1. The so-called isometric projection is perfect for drawing cubes without the use of vanishing points. A regular LEGO brick however is taller than wide, therefore a slightly different angle is used in this tutorial to make the construction easier.
Use the Line Tool, click your work space once and adjust the line settings:
Length: 200mm
Angle: 35°

2. Select the line by using either the Selection Tool (V) or select all (Command + A) and press the Enter Key to open the Move Window. Use these values:
Horizontal: 10mm
Vertical: 0mm
Press the Copy Button to duplicate the line. Use the shortcut Command + D to repeat the copy action for about 30 times.

3. Select all lines (Command + A) and mirror them (Object>Transform>Mirror) either horizontally or vertically. Make sure to press the Copy Button to duplicate your set of lines.

4. Select all and group it (Command + G). Them transform the group of lines into guidelines (Command + 5). This grid will help you construct the LEGO bricks and arrange them on your workspace. Make sure to make your guidelines magnetic (Command + U).
Basic Drawing of LEGO Brick
5. Use the Pen Tool (P) to draw the top and the two sides of your LEGO brick. Because of the 35° grid, your brick will have the height to width ratio of an original LEGO brick.

6. Draw an ellipse (L) with the following attributes:
Width: 4,2mm
Height: 3,1mm
Center it on the top of your brick by using the alignment options (Window – Align) or the magnetic grid.

7. Select the ellipse and press the Enter Key to open the Move Window.
Horizontal: 0mm
Vertical: 1mm
Press the Copy Button to duplicate the ellipse.

8. Select the duplicated ellipse, copy it (Command + C) and paste it in front of the existing (Command + F). Then switch to the Path View (Command + Y) and use the Direct Selection Tool (A) to select the upper Anchor Point of the lower ellipse. Delete this Anchor Point.

9. Select the upper Anchor Point of the upper Ellipse (the one you created last) and delete it as well.

10. Select the left Anchor Points of the lower as well as the upper ellipse. Join these two Anchor Points (Command + J) and repeat this step at the right side as well. This will create a closed path for the side of the cylinder.
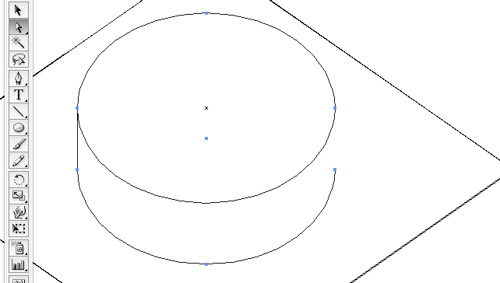
11. Change the view again (Command + Y) to take a look at your first LEGO brick. You could select rounded outlines to improve the look of it.
Coloring the Lego Bricks
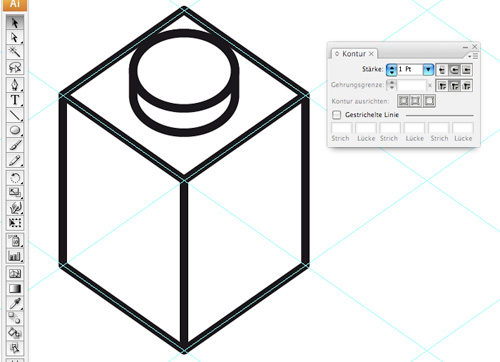
12. We want to be as flexible with the bricks as possible. Therefore a grayscale version of the brick is created first. Use the 10% Black Color Swatch (labeled “K=10”) to fill the top of the brick.

13. Use the following gradient values for filling the left side of the brick:
Type: linear
Angle: 235°
Left: K=20
Right: K=30
This will make it slightly darker at the bottom so you can see the rows of the final assembly.

14. Assuming that the lightening is mounted to your right, the right side will be slightly brighter. Adjust the gradient of the filling:
Type: linear
Angle: 305°
Left: K=10
Right: K=20

15. Fill the top of the stud with another gradient:
Type: liner
Angle: 180°
Left: K=10
Right: K=20

16. Finally fill the side of the stud:
Type: linear
Angle: 0°
Left: K=10
Middle: K=0, Position = 60°
Right: K=20

17. Remove the outlines of your brick. You can optionally drag the created gradients to your swatch library for further usage.

18. Use the Pen Tool (P) and draw a shape that matches the outline of the brick using the grid. Chose a color for the filling and make sure that it has no outlines.

19. Place it above your brick, go to the Transparency Window (Window>Transparency) and select Multiply from the drop-down menu. Change the color of your brick can be done with just two mouse clicks: select the overlaid object and chose the color you want.

Different Bricks
20. Many assemblies or even typefaces can be done with using the basic 1×1 brick, but a wider range of parts is very helpful – just like with real LEGO 🙂 However, most of the additional parts are based on the 1×1 brick.
Let’s create a 2×1 brick. Keep one version of the basic brick for further use and duplicate it twice for the new brick. Starting with the background object and place additional segments in front of it will save you a lot of time. Use the grid for the correct alignment.

21. The new brick already looks good, but we want to create a real 2×1 brick instead of two 1×1 bricks placed next to each other. Therefore move the two objects containing the color of the brick to the side.

22. Delete the top and the right side of the brick in the foreground. This will reveal the complete background brick. Remove its left side as well.

23. Use the Direct Selection Tool (A) and the grid to expand the remaining faces.

24. Use the Selection Tool (V) to select both colored paths and combine them with the Pathfinder (Window>Pathfinder). Select Add to Shape and press the Expand Button to create a single path.

25. Move the combined path back to where it came from. Now you have a real 2×1 brick in addition to the basic brick.

26. Creating even longer bricks is similar to what you did before and should not pose a problem to you. The final assembly of this tutorial even uses slope bricks (roof bricks) and inverse slope bricks, where the thinner end of the brick is one-third the height of the basic brick. Fill the slope path with 20% gray (K=20).

27. Once you created a new brick you should select all parts of it and group it (Command + G). This will help you construct more complex assemblies.
These seven bricks are used in this tutorial:
1×1 brick
2×1 brick
3×1 brick
2×1 slope brick (front view)
2×1 slope brick (rear view)
2×1 inverse slope brick (front view)
2×1 inverse slope brick (rear view)

Pixel Font for the Bricks
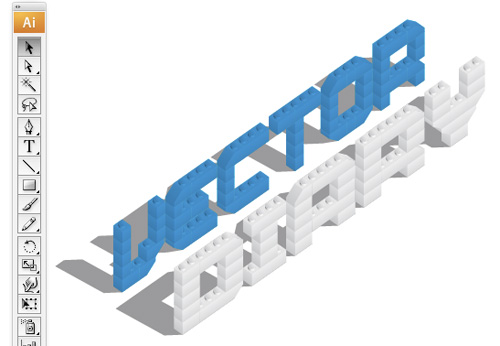
28. I created a pixel-style logotype for this tutorial. Feel free to create additional letters or use existing pixel fonts.

29. Rebuilding the pixel logotype with your bricks will result in a pseudo-three-dimensional logotype. Just copy/paste from your previously generated “brick pool” to your workspace. Once again, start from the background and place new bricks in front (that’s why copy/paste is favored over drag’n’drop + Alt).
Whenever you have troubles with foreground and background use the Layer Window to rearrange certain bricks. Alternatively you can use the shortcuts:
Move object up in stacking order (Command + ])
Move object down in stacking order (Command + [)
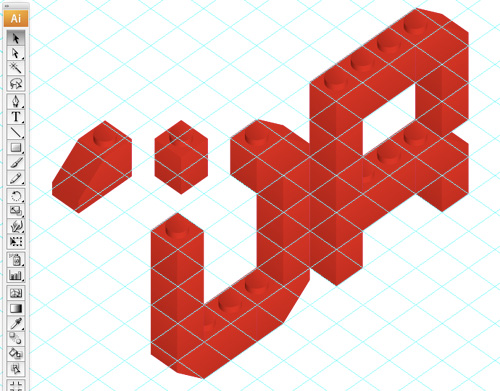
30. Continue with placing bricks on your workspace until your logotype is completed.

31. Use the Direct Selection Tool (A) to select the bricks and change their color. By using this tool only the upper path containing the color is selected. Otherwise the whole brick would be selected, recolored und therefore would lose its 3D style.

Adding in Shadows
32. Select the complete logotype and duplicate it.

33. Ungroup (Command + Shift + G) the duplicate and use the Pathfinder (Window>Pathfinder) to combine all shapes using Add to Shape. Press the Expend Button to make it just one object.

34. Fill it black and rotate (Object>Transform>Rotate) it -35° to bring the shadow to a horizontal position.

35. Now shear (Object>Transform>Shear) the shadow:
Angle: -50°, horizontally

36. Rotate (Object>Transform>Rotate) the shadow 35° to bring it back to its original position.

37. Use the Lasso Tool (Q) to select the upper line of shadow (“VECTOR”) and bring it to its correct position. Do the same for the lower line (“DIARY”). Use the Selection Tool (V) again to select the complete shadow and move it behind the bricks logotype (Command + [ ).
You could hide the guidelines (Command + ,) to get a better look at your logotype.
Ground Pattern
38. The green base area is way too big and contains to many studs to be built manually. So we use a pattern instead.
Create a flat 4×4 area (no sides needed) as seen in chapter 4 and group all (Command + G).

39. Use the Rectangle Tool (M) to draw a rectangle as seen below.

40. Select the 4×4 area and the rectangle and mask it (Command + 7). Then use the Pathfinder to remove the hidden parts (Window – Pathfinder – Trim).

41. Drag and drop the resulting rectangle to your Swatches to make it a pattern.

42. Use the Rectangle Tool (M) to draw the base area, move it to the background (Command + Shift + [) and fill it with the previously created pattern. The studs of the pattern won’t align themselves with the grid and moving the base area won’t help either. But since you are almost done you can switch off the magnetic guidelines (Command + U) and move the logotype with its shadow so it fits the base.

43. Finally copy the rectangle, paste it in front (Command + F), fill it green and set its transparency to Multiply.

To download the source file for this tutorial, you will need to login as a member.
Sign up today to access all exclusive members content!

really interesting tutorial thanks a lot
wow, absolutely bookmarked 🙂
great tutorial!
Thanks
one of the best tutorials i’ve seen in a while! thanks!
Very Useful! Keep them coming!!!
thats what she said
Mac, are you a lego fan from long ago? I am – and grew up with this stuff – so it has a ‘soft spot’ in my heart. Had to bookmark this one for future reference – and not running out of blocks is a major plus too. Keep ’em coming, please.
PS: This sort of thing doesn’t come naturally for me so I have to really concentrate so I don’t miss anything.
Thank you so much for this. I’m doing a project on LEGOs for one of my classes and after being unsatisfied with what Illustrator’s 3D tool produced, this was a life-saver. Looks great!
thank you so much. I really like this tutorial 😀 . and it is something I’m looking for as well
very nice thank u for posting.
thanks, awsome tutorial
付后,我相信网站所有者应这手法很多,从这个博客剑拔弩张顾客愉ghjkljk
Very well written, useful tutorial thanks
Super original tutorial, I love it!
Sunt convins ca acest post a impresionat tot internetul.
Este o tema placuta pentru a crea un nou internet site.
Wow! Super original tutorial, I love it!
very very nice thank